By default when your web server does not find an index file (i.e. a file like index.php or index.html), it automatically displays an index page showing the contents of the directory. This could make your site vulnerable to hack attacks by revealing important information needed to exploit a vulnerability in a WordPress plugin, theme, or your server in general. In this article, we will show you how to disable directory browsing in WordPress.
Why You Need to Disable Directory Browsing in WordPress
Directory browsing can be used by hackers to find out if you have any files with known vulnerabilities, so they can take advantage of these files to gain access. For the comprehensive security of our sites, we use Sucuri for WordPress security. They have a simple dashboard which allows us to do this and perform many other WordPress security strengthening steps with in few clicks.
Directory browsing can also be used by other people to look into your files, copy images, find out your directory structure, and other information. This is why it is highly recommended that you turn off directory indexing and browsing.
Video Tutorial
If you don’t like the video or need more instructions, then continue reading.
To disable directory browsing in WordPress all you need to do is add a single line of code in your WordPress site’s .htaccess file located in the root directory of your website. To edit the .htaccess file you need to connect to your website using an FTP client.
Once connected to your website, you will find a .htaccess file in your site’s root directory. .htaccess is a hidden file, and if you can not find it on your server, you need to make sure that you have enabled your FTP client to show hidden files.
You can edit your .htaccess file by downloading it to your desktop and opening it in a text editor like Notepad. Now at the end of your WordPress generated code in the .htaccess file simply add this line at the bottom:
1
Options -Indexes
Now save your .htaccess file and upload it back to your server using your FTP client. That’s all you need to do. Directory browsing is now disabled on your WordPress site and people trying to locate a directory index on your website will be redirected to WordPress 404 page.
How to Force Download of Mp3 Files Instead of Streaming
For example, you’re running a mp3 site on wordpress and hosting audio files on your own server. By default when an user click on a mp3 file link, it automatically play the audio instead of downloading. This could make your site user annoying as he have to right click on the file and choose Save As to download it. In this article, we will show you how to Force Download of Mp3 files instead of Streaming without plugins.
You can disable this streaming feature in WordPress by add some lines of code in your WordPress site’s .htaccess file located in the root directory of your wordpress install. To edit the .htaccess file you need to login into your hosting and navigate to File Manager.
Once navigated to your file manager, you will find a .htaccess file in your site’s root directory. .htaccess is a hidden file by default, so if you can’t find it on your server, you need to make sure that you have enabled your file manager to show hidden files.
You can edit your .htaccess file by downloading it to your pc or code edit feature on your server. After open it at the end of your WordPress generated code in the .htaccess file simply add these lines at the bottom as shown in the image below:
1
2
3
4
<FilesMatch“\.(mov|mp3)$”>
ForceType application/octet–stream
Header set Content–Disposition attachment
</FilesMatch>
You can change or add any other file type based on your need (example: pdf, mp4, doc)
Now save your .htaccess file. That’s all you need to do. Streaming feature is now disabled on your WordPress site and people can download mp3 files hosting on your blog by just click on it.
We hope this article will help you to learn How to force download after a click on the mp3 file link. For questions and feedback you can leave a comment below or join us on our forum.
Duplicating posts is a very useful functionality when you work with a lot of similar posts (for example products in online shop). Especially if the posts have the same custom fields values, but the different post title and content.
It means that you do not have to re-enter custom fields, post tags and categories each time.
This is the example:
When you click the «Duplicate» link, the post will be cloned, but it won’t be published, it will be saved as a draft and you will be redirected to the post edit admin page.
This is enough easy to do, so, look at the following code, insert it into your theme functions.php file (or into the another file if you know what to do).
/*
* Function creates post duplicate as a draft and redirects then to the edit post screen
*/
function rd_duplicate_post_as_draft(){
global $wpdb;
if (! ( isset( $_GET['post']) || isset( $_POST['post']) || ( isset($_REQUEST['action']) && 'rd_duplicate_post_as_draft' == $_REQUEST['action'] ) ) ) {
wp_die('No post to duplicate has been supplied!');
}
/*
* get the original post id
*/
$post_id = (isset($_GET['post']) ? absint( $_GET['post'] ) : absint( $_POST['post'] ) );
/*
* and all the original post data then
*/
$post = get_post( $post_id );
/*
* if you don't want current user to be the new post author,
* then change next couple of lines to this: $new_post_author = $post->post_author;
*/
$current_user = wp_get_current_user();
$new_post_author = $current_user->ID;
/*
* if post data exists, create the post duplicate
*/
if (isset( $post ) && $post != null) {
/*
* new post data array
*/
$args = array(
'comment_status' => $post->comment_status,
'ping_status' => $post->ping_status,
'post_author' => $new_post_author,
'post_content' => $post->post_content,
'post_excerpt' => $post->post_excerpt,
'post_name' => $post->post_name,
'post_parent' => $post->post_parent,
'post_password' => $post->post_password,
'post_status' => 'draft',
'post_title' => $post->post_title,
'post_type' => $post->post_type,
'to_ping' => $post->to_ping,
'menu_order' => $post->menu_order
);
/*
* insert the post by wp_insert_post() function
*/
$new_post_id = wp_insert_post( $args );
/*
* get all current post terms ad set them to the new post draft
*/
$taxonomies = get_object_taxonomies($post->post_type); // returns array of taxonomy names for post type, ex array("category", "post_tag");
foreach ($taxonomies as $taxonomy) {
$post_terms = wp_get_object_terms($post_id, $taxonomy, array('fields' => 'slugs'));
wp_set_object_terms($new_post_id, $post_terms, $taxonomy, false);
}
/*
* duplicate all post meta just in two SQL queries
*/
$post_meta_infos = $wpdb->get_results("SELECT meta_key, meta_value FROM $wpdb->postmeta WHERE post_id=$post_id");
if (count($post_meta_infos)!=0) {
$sql_query = "INSERT INTO $wpdb->postmeta (post_id, meta_key, meta_value) ";
foreach ($post_meta_infos as $meta_info) {
$meta_key = $meta_info->meta_key;
$meta_value = addslashes($meta_info->meta_value);
$sql_query_sel[]= "SELECT $new_post_id, '$meta_key', '$meta_value'";
}
$sql_query.= implode(" UNION ALL ", $sql_query_sel);
$wpdb->query($sql_query);
}
/*
* finally, redirect to the edit post screen for the new draft
*/
wp_redirect( admin_url( 'post.php?action=edit&post=' . $new_post_id ) );
exit;
} else {
wp_die('Post creation failed, could not find original post: ' . $post_id);
}
}
add_action( 'admin_action_rd_duplicate_post_as_draft', 'rd_duplicate_post_as_draft' );
/*
* Add the duplicate link to action list for post_row_actions
*/
function rd_duplicate_post_link( $actions, $post ) {
if (current_user_can('edit_posts')) {
$actions['duplicate'] = '<a href="admin.php?action=rd_duplicate_post_as_draft&post=' . $post->ID . '" title="Duplicate this item" rel="permalink">Duplicate</a>';
}
return $actions;
}
add_filter( 'post_row_actions', 'rd_duplicate_post_link', 10, 2 );
But what if this code works only for posts, not for pages or any registered post types? Do not worry, all we need to do is to change the last filter to this:
So I had a request to add a super big menu in WordPress, and some sub menu’s and then after configuring the menu and clicking save half my menu disappeared. Apparently there is a limit that is set.
This limit is not imposed by WordPress but by your web hosting server because of some security reasons. In PHP, there is a thing called post vars that controls menu items. By default maximum post vars are much limited as most of the websites require only a few menu items.
It is very easy to increase number of post vars using php.ini
All you need to do is adding a piece of code in your php.ini file. Keep in mind that different web hosts support different kind of methods and we have listed all here;
Increasing max_input_vars
To increase input_vars add the following code in your php.ini file
max_input_vars = 3000;
Note – Create a text file name php.ini and add this code to that file and place this file in your WordPress root. If your host doesn’t support custom php.ini file get their support to add this code ot php.ini file
If your server is using Suhosin
If your hosting server has Suhosin running, it will affect your WordPress menu limit and you need to add the following code in your php.ini file;
suhosin.post.max_vars = 5000
suhosin.request.max_vars = 5000
Other methods
If above given workarounds don’t work, you can also try some other;
1.Add php.ini in wp-admin folder
Create a php.ini file with the below given code and put it into wp-admin folder
max_input_vars = 3000;
This is the one that worked for me!
2.Add .user.ini file
Create a file .user.ini and add the following code to it and try placing it in WordPress root or in wp-admin folder;
Knowing how to reset your WordPress password from phpMyAdmin is one of the essential things you should know about because for some reason if your site is hacked, or something else, you are no longer able to login to your admin panel using the login information, and you are not able to reset the password via email, this method can be very useful. We have helped three users with the same issue therefore we have decided to do this writeup.
Every WordPress blog uses a MySQL Database which can be accessed through your phpMyAdmin even if you are not using cPanel hosting. Follow the following steps to reset your WordPress password:
Video Tutorial
If you don’t like the video or need more instructions, then continue reading.
Step 1 – Identify the Name of your Database
It is always good to know the name of your WordPress Database. Sometimes you might be running multiple installations within the same database, then you will need to know exactly where to look for to reset the password. The best place to look is your wp-config.php file which is located in your root WordPress Directory. In there you will find the name of your database.
Step 2 – Locating Database and Editing the Fields
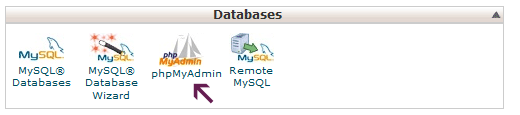
In your cPanel or other admin panel, you will need to access your MySQL database and then browse it via phpMyAdmin.
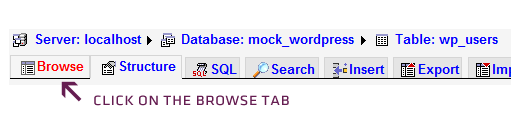
Once you are in phpMyAdmin, you will need to select the correct database on the left hand side. Look for the name that you found in your wp-config.php and click on that. You will see a list of tables with a prefix wp_ for the most part.
If you changed your prefix during installation, then you would be looking for that specific prefix “for ex: wp673_”.
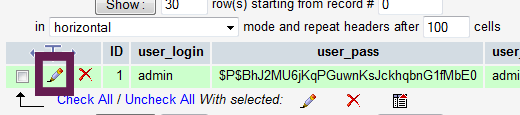
You will look for the table wp_users, click on it and then click on the Browse Tab.
Click on the Pencil (Edit) Icon to reset your Password.
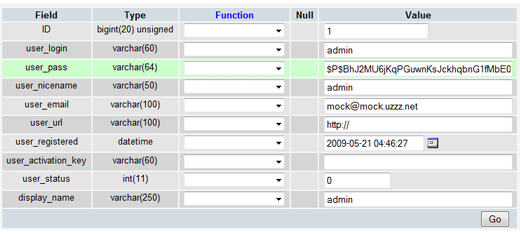
Now you will see a field that looks like this:
Edit the user_pass field value. You will notice that there are a lot of random characters in the password field. Due to security reasons, WordPress stores the passwords as MD5 Hash rather than Plain text.
This means that you will not be able to enter plain text as the password. You would need to use one of the MD5 generators online to generate your password.
Simply type your password in that tool and generate MD5 results. Copy and paste the code you get from the converter into your phpMyAdmin field and click Go to save changes.
You have now successfully changed your WordPress Password from phpMyAdmin.
So there might come a time in your testing life when you need to test and verify payment details, check out the site http://www.getcreditcardnumbers.com/ which generates credit card details that pass the MOD 10 algorithm (Luhn algorithm).
CSS Classes are an advanced menu property that allow you to apply a CSS class to individual menu items. Turn on the CSS Class capability by clicking the Screen Options drop down at the top-right of your screen, and check the box for CSS Classes:
For some themes, like Soundcheck, there is existing CSS in the theme that will convert your menu item to a photo. All you need to do is add the class to a custom link that the theme documentation refers to.
If you are looking to implement your own CSS styling on your menu items, you will need aWordPress.com plan which includes advanced customization. In the above example, you could then stylize the link with the selector .twitter in your CSS.
So, a client of yours says they like a site, and we should model something similar.
If the site is on WordPress I use http://www.wpthemedetector.com/ to extract the theme, and plugins running. This gives me a good idea of where to start.
Okay … So on Windows 7 sometimes after installing WAMP you have an issue starting the WAMP Server. This is caused by port 80 using used by IIS. So to change the Apache port for WAMP complete the following:
How to change WAMP server port number windows 7
Go to c:\wamp\bin\apache\Apache (your version)\conf
Open httpd.conf file
Search for Listen 80
Change the line “Listen 80” to “Listen 8080” (or Listen You can use any no)
Save the file and close it
Then open http://localhost:8080/ , next to the localhost place the port no you changed in the httpd.conf file
This solution is really helpful to use both IIS and WAMP server.
A little about me - Experienced senior Business/System Analyst with Project Management Experience and a flare for design. I've also got a couple years ESL instruction experience.
MYMOTTO
Dream, Dedication, Determination, Direction and Destination.